Introduction to Processing Workshop
What is Processing?
Processing is an "open source programming environment for teaching computational design and sketching interactive media software" developed by Ben Fry (data visualization) and Casey Reas (installation artist).
Speaking on the development of Processing, Reas says: "For us, the big idea of Processing is the tight integration of a programming environment, a programming language, a community-minded and open-source mentality, and a focus on learning -- created by artists and designers, for their own community."
Processing has a really great community around it, starting with a vast and diverse supply of tutorials on how to get started with Processing, including the publicly-available book Getting Started with Processing, around which this introduction is based, an in-depth and friendly programming reference, and very active forums and development community (creating add-ons called "Tools" to the vanilla Processing language which help make certain kinds of projects (e.g. highly interactive, physics-based programs, audio-focused), easier).
How this Workshop Will Run
- Introduction to Processing fundamentals
- A few micro-assignments, along the way
- Showcasing of templates (powerful, well-documented, adaptable code) to see what Processing is capable of
- Working on your own, with my help
First Steps
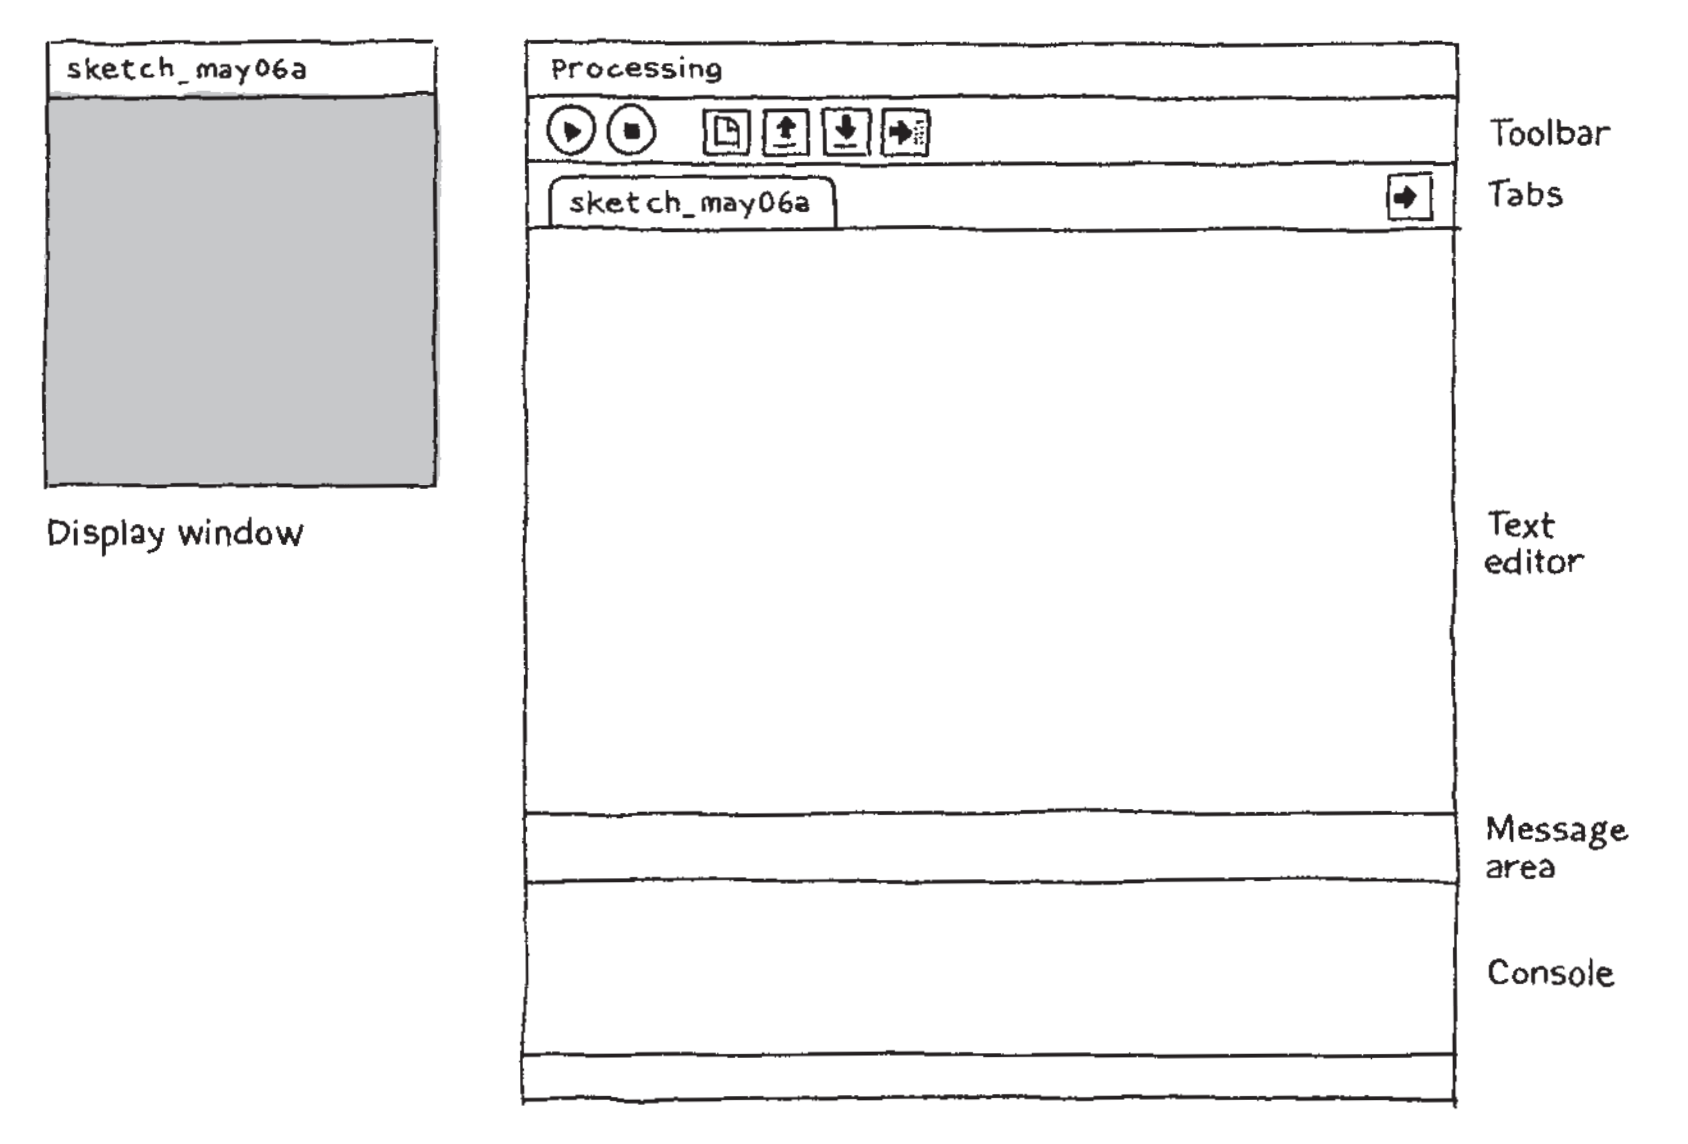
Get access to Processing! You can download Processing here. Once you've installed, open up the program so you see something like this:
Note: we are going to use Processing in Java mode, but there are also Python, Javascript, Android, and other modes available!
Write the following code snippets in the Processing IDE and hit "Run". Don't worry about the explanations for now.
Hello, World!
ellipse(50, 50, 80, 80);This code calls the function ellipse() with the arguments 50, 50, 80, 80. A function is a named procedure that has a certain behavior, in this case, drawing an ellipse (also a circle). The arguments change the behavior of the function, in this case specifying where and how large to draw the circle.
First Interaction
void setup() {
     size(480, 120);
     smooth();
}
void draw() {
     if (mousePressed) {
         fill(0);
     } else {
         fill(255);
     }
     ellipse(mouseX, mouseY, 80, 80);
}
This code includes the setup() and draw() functions. setup() is only run once and should appear before draw(). draw() loops infinitely (by default) and allows us to do animation and interaction. The setup() function here defines the size of the window and turns on smoothing (AKA anti-aliasing, via smooth()). The draw() function first tests if the mouse is being held down (using the variable mousePressed): if it is, the fill color is changed to black using the fill(0) function, if it isn't, the fill color is changed to white using the fill(255) function. An 80x80 circle with that color is then drawn where the mouse cursor is (using the variables mouseX and mouseY).
Format your code to be as readable by humans as possible. There is, however, room for style: the tabs and such (in this language) do not change the functionality of the code, just how it looks, so ultimately you may format as you like. Be expressive but legible.
- Functions of IDE (start, stop, save, open, etc.)
- Examples and Reference - Access via Processing itself and the online reference
Nano-Assignment 1: Find reference and documentation for ellipse
Drawing
The pixel grid and Cartesian plane
Drawing in Processing requires an understanding of the pixel grid on computer screens. Your computer screen is made up of many squares placed next to one another. We can describe the area and density of these squares through screen resolution: for example, 1920 x 1080, 500 x 500, 10 x 10, etc.
Each pixel's location on this grid can be defined via application of the Cartesian plane. X (horizontal) and Y (vertical) coordinates (pairs of numbers), starting from 0 and going to the bounds of the screen resolution, define these locations. Unlike a standard Cartesian plane, Processing considers the top-left corner the origin. For example, with a screen resolution of 100 x 100, [0,0] is the pixel at the top left, [49,49] is the pixel at the center of the screen and [0,99] is the pixel at the bottom left. What are the coordinates of the pixel at the top right?
Window, Point, Shapes
Processing defines the resolution of its window through the size() function. A function is a named procedure that has a certain behavior, in this case, defining the size of the window. For example, size(100,200) will make a 100 x 200 resolution pixel grid. The numbers 100 and 200 are called arguments. Arguments are values that change the behavior of a function, in this case defining the width and height of the size() function.
point() is one of the simplest drawing functions. It simply draws a point on the pixel grid given X and Y arguments. point(0,0) draws a point at the top left, point(0,10) draws a point 10 pixels away to the right of that, and so on.
Beyond point(), there are many shape functions(), each of which has different arguments.
ellipse(), for example, takes as arguments x-coordinate, y-coordinate, width, and height. For example, ellipse(50,50,80,80) draws an ellipse 50 pixels from the left and 50 pixels from the top of the screen with width 80 pixels and height 80 pixels (a circle).
Other shape functions include rect(), line(), and triangle(). To see what arguments they take check out the Processing reference.
Comments
You can insert notes to yourself or another reader of your code using comments. In Java mode of Processing you can place comments in two ways.
First, on a single line through double forward slashes:
// this is a commentand second, over multiple lines using /* and */:
/* this is a very long comment, including a number of different clauses, that could be useful when describing a chunk of code or a particularly nasty bug */Controlling Draw Order
Processing code compiles (the process of converting code into computer-runnable instructions) from top to bottom. This means that shapes overlap in order from bottom to top: a shape drawn after another shape will be drawn on top of that shape. Think about it. Play around with the order in which shapes overlap by re-arranging the order of your code.
Color
Up until this point our shapes have been very drab. We can add color to our sketches by using the stroke() and fill() functions before calling shape functions, like dipping a brush into paint before painting. The color that outlines a shape is called the stroke and the color that fills in a shape is called the fill. Color in Processing is defined through 8-bit numbers, either in grey-scale (a single number from 0 (black) to 255 (white)) or as RGB values (three numbers corresponding to the amount of red, green, and blue in the color, each ranging from 0 to 255).
For example, stroke(255, 0, 0) and fill(0, 255, 0) will result in shapes with red outlines filled in with green. We could then call fill(255,255,0) to have another shape still have a red outline but a yellow interior (red + green = yellow). The order of these function calls matters. stroke() and fill() affect the color of shapes called after them until stroke() and fill() are called again. Play around with color!
We can remove shape outlines altogether by calling noStroke() (no arguments) or we can have only shape outlines by calling noFill() (no arguments).
We can also change the background color of the sketch using the background() function. For example, background(255,0,0); creates a red background.
Transparency
In addition to changing color, we can also change the transparency of shapes (how see-through they are) by simply adding an extra argument to the end of our calls to stroke() and fill(). This number ranges from 0 (completely transparent, invisible) to 255 (completely opaque, the default).
For example, fill(255, 0, 0, 128) will result in shapes being filled in with red that is half-transparent. This allows you to mix and blend colors, and also to see shapes below other shapes!
Custom Shapes (with vertex())
In addition to the standard shape functions available, you can create your own shapes by specifying a list of coordinates that correspond to the vertices (points) of that shape.
This is done first by starting the shape by calling the beginShape() function, calling the vertex() function any number of times, and then ending the shape by calling the endShape() function. If you want your shape to be closed (bounded by the outlining stroke) the first and last vertex in the list should be the same coordinates (end where you started!).
For example, the following code creates a right triangle:
beginShape();
  vertex(0,0);
  vertex(0,50);
  vertex(50, 50);
  vertex(0,0);
  endShape();
Micro-Assignment 1: Using points, lines, and shapes, along with custom colors and/or transparency, make a Doodle/Creature/Construction to show the class!
Variables
Why Variables?
Up until this point we have been programming only with functions and numbers (corresponding to X and Y coordinates, colors, amount of transparency, etc.). A variable is a named container for a value. Variables can be used anywhere you would use a number in the previous code. Variables can be created (declared), assigned a value (initialized), and re-assigned a value (updated). For example, the following code draws an ellipse using arguments associated with variables x, y, w, h rather than numbers:
int x = 50;
  int y = 50;
  int w = 80;
  int h = 80;

  ellipse(x, y, w, h);
This does what we already can do but with more code (not so great!), but variables can also save us typing and clarify procedures. If we only wanted to draw circles we could collapse variables w and h into a single variable, say, s (for size):
int x = 50;
  int y = 50;
  int s = 80;

  ellipse(x, y, s, s);
It's also important to remember that variable names can be anything, as long as you're consistent. In general, you should use variables that are short and easy to remember (such as abbreviations).
Data Types
The "int" in the previous example specifies the data type of the variable after it. "int" is short for integer, the standard numbers we count with (1,2,3,4,5, etc.). Other data types include float (numbers with decimals), boolean (special logical variables that are either true or false), color (contains a color), and char (character).
int integer;

  integer = 42;
  float decimal = 0.35;
  boolean logical = true;
  char character = 'A';
The integer variable in the above example is declared (first line) separate from its initialization (second line). This can be useful for grouping variables together.
Mathematical operators (
+, -, *, /)The standard mathematical operators can be used to add, subtract, multiply and divide numerical variables (int and float). This can be useful for creating precise but easy-to-change relationships between variables. For example, the following code defines the geometric sequence of a fundamental frequency and its overtones:
int fundamental = 440;
  int overtone1 = fundamental*2;
  int overtone2 = fundamental*3;
  int overtone3 = fundamental*4;
Instead of having to update four variables, only one has to be updated! Similarly, the other mathematical operators can be used.
Increment (
+=, ++) and decrement (-=, --)A very common mathematical operation is updating a variable by 1. This operation can be used to make a variable a counter. For example, every time some event happens 1 is added to it. Because of the prevelance of these operations, what are called incrementation (adding a value) or decrementation (removing a value), Processing (and other programming languages) include short hand for them.
int counter = 10; // declare and initialize
  counter = counter + 1; // This is the same as...
  counter += 1; // ...this and...
  counter++; // ...this!
Comparison: the
if-elsestatementControl structures are special functions which allow us to analyze variables and have the programming language make choices based on them. We can compare variables and run different code depending on the results using the
if-elsestatement.if-elsetypically acts upon numerical values using comparison operators:<, >, <=, >=, ==, and !=. The result of a comparison operator is a boolean value (true or false). The following code tests two variables. If they are equivalent, the fill color is set to black, else the fill color is set to white.int a = 10; int b = 11; if( a == b) { fill(0); } else { fill(255); } ellipse(50,50,10,10);Repetition: the
for loopAnother highly effective control structures is the
forloop. The for loop allows us to control the bounds of repetition, update variables, and, most importantly for humans, prevent gratuitious copy-pasting! The for loop contains three sections:for( <declaration> ; <test> ; <update> ) { }The declaration section typically involves declaring and initializing a variable. The test section acts as a mini if-else statement: if the statement about the variable is true, the loop continues, otherwise it stops and the code continues. The update section updates the variable, often using incrementation or decrementation. For example:
for( int i = 0; i < 20; i++) {
  // do things 20 times in here
  // we can also access i as a counter (0,1,2,3,4,...)
  }
For loops can be used to great effect in computer graphics.
Nested
for loopsSingle for loops can be useful to do things multiple times and to manage a single variable, but we can also create loops within loops (and loops within loops within loops within...). Doubly-nested for loops can be useful in the context of 2-dimensional motion graphics: one loop loops over horizontal space and the other loop loops over vertical space. For example:
size(300,300); // set up a 300 x 300 resolution canvas

  int size = 20; // size of squares
  int border = 10; // border between squqres

  for(int x = 0; x < 255; x += size) {
        for(int y = 0; y < 255; y += size) {
             fill(x,y,0); // update color based on location
          rect(x,y,size-border,size-border); // draw squares
        }
  }
Micro-Assignment 2: Use variables, nested for loops, and at least one if-else statement to construct a pattern that fills the sketch window
Interactivity
draw() and setup() functions
The setup() and draw() functions allow us to organize our code in useful ways. setup() is only run once and should appear before draw(). draw() loops infinitely (by default) and allows us to do animation and interaction. For example (returning to our first interaction):
void setup() {
   size(480, 120); // setup a size
   smooth(); // smooth the graphics
  }
  void draw() {
       if (mousePressed) { // test if mouse is pressed
           fill(0); // black
       } else {
           fill(255); // white
       }
       ellipse(mouseX, mouseY, 80, 80); // draw ellipse
  }
The setup() function here defines the size of the window and turns on smoothing (AKA anti-aliasing, via smooth()). The draw() function first tests if the mouse is being held down (using the variable mousePressed): if it is, the fill color is changed to black using the fill(0) function, if it isn't, the fill color is changed to white using the fill(255) function. An 80x80 circle with that color is then drawn where the mouse cursor is (using the variables mouseX and mouseY).
Tracking the mouse
Erasing/not erasing
Using first derivative (distance) to change parameters on the fly
Smoothing (feedback, easing)
Mapping X-Y of mouse to different scale with map()
mousePressed variable (testing boolean with if)
Determining location (if-else structure to determine mouse left and right)
Bounds of shapes (circle (with dist()), rectangle)
Micro-Assignment 3: Change different color on click when mouse inside and outside rectangle
- char variable
- Key Presses
- Simple Typography
- Moving objects with Arrow keys
Media
You can download a folder of media here:
- Special data folder and how to use it
- Loading an image
- Working with fonts (loading, drawing)
- Drawing shapes
Motion
- Frame rate
- Moving shapes, wrapping (one-dimensinal)
- Bouncing (changing direction)
- Tweening
- Randomness
- Draw randomly, move randomly
- Timer
- Polar coordinate space using sin() and cos()
- Translate, rotate
- pushMatrix(), popMatrix()
- Scaling
Functions
- Creating functions
- Importance of code re-use (and connection to variable re-use)
- Return values
Objects
- Defining classes
- Constructors, methods, data (and getters/setters)
- Instantiating objects, making multiple objects
- Separate files
Micro-Assignment 4: Create your own object, with data and behavior, and make two instantiations of it
Arrays
- Importance of using arrays (abstracting data types)
- Declare and assign arrays
- Arrays storing history
- Object arrays
Go to 3D land if we have extra time...
Templates
You can download templates here:
- Working with Sound (Analyzing Frequency Bands of File or Mic)
- Working with Video (Processing and Analyzing Live Video)
- Shaders (High Performative Animation Generation and Image Processing)
- Communicating with other programs using OSC (Max, Pure Data, Ableton Live, etc.)
- Defining Objects That Use Other Objects (Multiple Interacting Classes)
Use(r)s of Processing